This page describes a modification to the fuel tank of Ford Powerstroke diesel trucks
known as "harpooning the tank". Owners of 7.3, 6.0, and 6.4 liter diesel
trucks universally complain that it takes a very long time to get the last 5 gallons of
fuel in their tanks. The fill nozzle will repeatedly click off due to fuel foam
rising up the fill tube. So you try to run the pump at the slowest delivery rate
possible, and some truck stops don't deliver very slow, and it will still take a really
long time to completely fill the tank. Many users just don't bother to get the last
5 gallons in the tanks, but if you pull heavy loads getting every last drop at a fillup
may be important.
So, if everyone complains, why doesn't Ford fix the problem? Well it seems that Ford
uses the same tank for gas and diesel powered trucks. The tank on a gas powered
truck requires substantial air space at the top of the tank because of emissions mandated
vapor recovery systems. Further, gasoline expands at a higher rate as fuel
temperature increases, so air space is required to prevent expelling fuel in hot weather.
Lastly, diesel fuel foams when agitated during filling, while gasoline foams very
little.
Most importantly, diesel tanks do not have a vapor recovery system because diesel fuel is
much less volatile than gasoline. Do not try this modification on a gasoline powered
truck.
When I set out to do this modification I found it was hugely popular, and I found much
discussion of the procedure, but I was disappointed in the lack of photographs available.
It's impossible to see the top of the tank with the truck bed in place, so some
photos showing what I was getting into would have been very helpful and reassuring.
So, I decided to shoot some photos as I went along and I hope others will find this
useful.
There is pre-existing work on the internet that should be reviewed before attempting this
modification. Follow the links below to see the resources that I relied upon to do
my own harpoon modification.
http://www.forgotton.net/diesel/intank/
Here you will find a good basic description of the procedure with photos of the tubes
inside the tank. Apparently this guy put his camera inside the fuel tank to shoot
the photos. His photos and text are helpful, and I'm certainly not going to stick my
camera inside a fuel tank so I'm thankful for his photos. He describes "looking
inside the tank" and I can assure you that you cannot see the tubes inside my fuel
tank. Perhaps his tank was different than mine.
http://guzzle.rbmicro.com/hutch.html
This page is primarily intended to describe the "hutch" modification. This
is a modification that applies only to the 7.3 liter trucks as Ford fixed the problem in
the later version 6.0 and 6.4 liter systems. But the steps necessary to access the
hutch modification are largely the same as for the harpoon modification, and anyone with a
7.3 liter truck would probably want to consider doing both at the same time. This
page was the best source of photos that I found of the outside of the tank.
http://www.ford-trucks.com/forums/
Lastly, the Ford Truck Enthusiasts web site has a wealth of information. A search of
the forums, particulary those dedicated to the Superduty trucks, and the 7.3 or 6.0 liter
motors, will turn up lots of information. To make best use of the forums you should
consider registering. Registering is free, and you can use the site even if you
don't. You won't find many photos, but lot's of discussion from those who have done
the modification.
My photos and descriptions below should be viewed only as an addition to what is available
elsewhere on the internet. I've commented primarily on aspects that I did not find
elsewhere, or that I did a little differently. Hopefully the photographs will help
fill the digital void. I am not endorsing this modification, or posing as an
authority. I am only describing my experience.
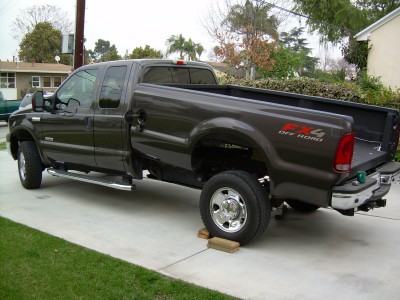
Lastly, a description of my truck is in order. This modification was done to a 2006
Ford F250, 6.0 liter diesel motor, Supercab, long bed. The long bed tanks are rated
at 38 gallons. Short bed trucks are rated at 30 gallons and may vary slightly.
|
| Enlarge Photo
 I chose to
lift the bed instead of dropping the tank. Either method will work, and each has
advantages and disadvantages. Since I was working alone and had only a small floor
jack, lifting and blocking the bed seemed easier than man-handling the tank.
Particularly since the day I chose to work on this I still had over 1/4 tank of
fuel. Lifting the bed is very easy to do. If you have the proper equipment you
can completely remove the bed and enjoy very easy access to the top of the tank. But
tilting the bed is easy too. I chose to
lift the bed instead of dropping the tank. Either method will work, and each has
advantages and disadvantages. Since I was working alone and had only a small floor
jack, lifting and blocking the bed seemed easier than man-handling the tank.
Particularly since the day I chose to work on this I still had over 1/4 tank of
fuel. Lifting the bed is very easy to do. If you have the proper equipment you
can completely remove the bed and enjoy very easy access to the top of the tank. But
tilting the bed is easy too.
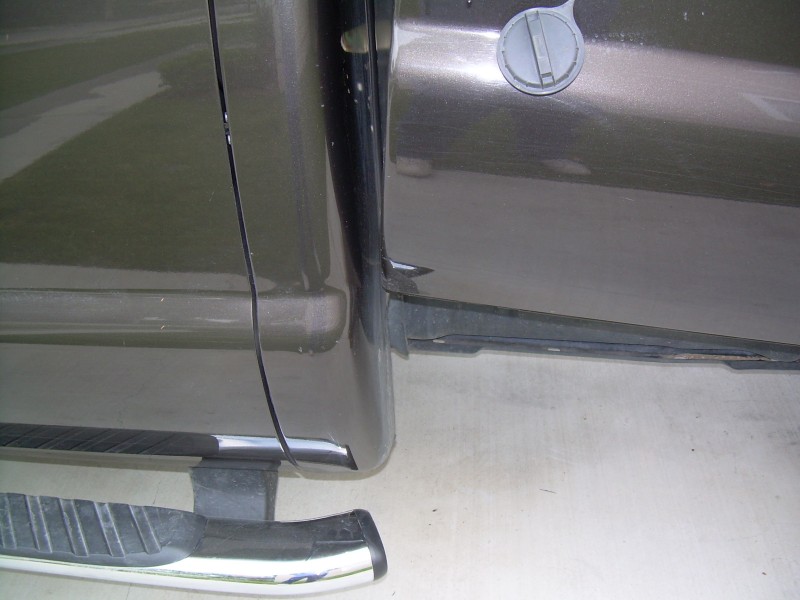
To begin, remove your tailgate because it will just be in your way getting into the bed,
and it might cause interference with the bumper. On my longbed truck, there are 8
bed bolts. They are torxs style bolts. I removed the 6 forward bolts.
The rearmost 2 bolts I backed out about 3/4", but did not remove them. These 2
bolts will serve as the hinge point for tilting the bed. I suggest you try
loosening your bed bolts a day or two before you start this project to make sure they will
come out. Bed bolts often are difficult to remove and a shot of penetrating
lubricant on the threads a day in advance will help. If they just won't budge you
may want to drop the tank instead. On the other hand, you could take this
opportunity to cut the offending bolts out and replace them. Mine all came out
without fuss. The bolts thread into captive nuts in the truck frame.
Once you have the bed bolts removed and the rear 2 loosened, disconnect the filler spout
from the bed. Open the fill door, remove the fuel fill cap, and remove the 3 sheet
metal screws. You cannot get to the 3 screws unless the plastic cap is off, so be
careful not to drop the screws or your socket wrench down the fill opening. This
will ruin your whole day. There is no need to remove the fill or vent hose from the
spout. The spout will simply drop down.
You won't need to disconnect any electrical connections to the tail lights unless you are
completely removing the bed. When ready to tilt the bed, use a suitable length of
lumber on your floor jack pad up to a cross-member on the bottom of the bed. You
should have some scrap lumber available to make lifting extenders and blocks as needed. |
Enlarge Photo
 Slowly,
very slowly, raise your jack. Insert blocks, one at a time as you lift. If you
have a helper, have him stabilize the bed side to side as it may try to twist on you a
little bit. But I was able to do it by myself. Keep an eye on the clearance
between the bed and the cab to avoid scratching any paint. I had to use two
different lift extenders to go high enough, but this will depend on the travel of your
floor jack. Safety first! Use suitable caution until you've got the bed
resting solidly on blocks. Don't reach or put any body part into any crush zones. Slowly,
very slowly, raise your jack. Insert blocks, one at a time as you lift. If you
have a helper, have him stabilize the bed side to side as it may try to twist on you a
little bit. But I was able to do it by myself. Keep an eye on the clearance
between the bed and the cab to avoid scratching any paint. I had to use two
different lift extenders to go high enough, but this will depend on the travel of your
floor jack. Safety first! Use suitable caution until you've got the bed
resting solidly on blocks. Don't reach or put any body part into any crush zones. |
Enlarge Photo
 Also
keep an eye on your bed at the rear bumper to avoid a collision. Mine cleared
without any problem, but this may vary depending on your bed length and your bumber
style. A cup of quality coffee will make this go so much better. Also
keep an eye on your bed at the rear bumper to avoid a collision. Mine cleared
without any problem, but this may vary depending on your bed length and your bumber
style. A cup of quality coffee will make this go so much better. |
Enlarge Photo
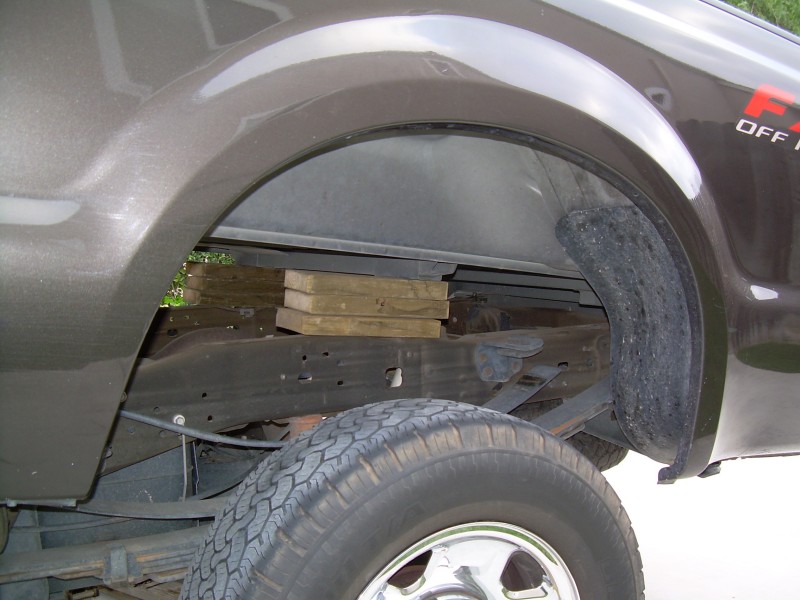
 I
inserted blocks under the cross-member at the second row of bed bolts from the rear.
As you can see in this photo, 3 pieces of 2x lumber, and this was enough to give me
plenty of clearance above the fuel tank. Again, a short bed will be a little
different geometry. I
inserted blocks under the cross-member at the second row of bed bolts from the rear.
As you can see in this photo, 3 pieces of 2x lumber, and this was enough to give me
plenty of clearance above the fuel tank. Again, a short bed will be a little
different geometry. |
Enlarge Photo
 In
this picture you can see the object of our operation. The fuel tank has a raised
area on each end, and a reduced height area in the center where the fuel pickup and float
assembly are installed. On the front and rear raised areas are air vents. If
you are dropping the tank you will need to remove those vent lines. They just pull
off the barbed fitting. By lifting the bed it was not necessary to disturb those
vent lines. In
this picture you can see the object of our operation. The fuel tank has a raised
area on each end, and a reduced height area in the center where the fuel pickup and float
assembly are installed. On the front and rear raised areas are air vents. If
you are dropping the tank you will need to remove those vent lines. They just pull
off the barbed fitting. By lifting the bed it was not necessary to disturb those
vent lines. |
Enlarge Photo
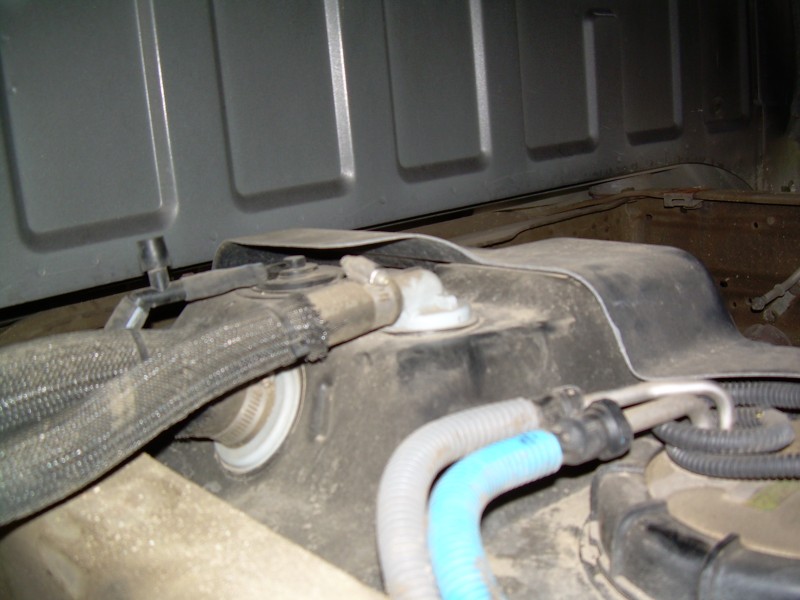
 In
this photo you get a good view of the fuel fill hose, the fuel fill vent hose, the front
air vent, and the fuel supply and return lines. The fuel system on the Powerstroke
is a recirculating system, so you have a 3/8" draw hose and a 5/16" return
hose. To remove the two fuel lines you will need fuel/AC quick disconnect
tools. These are simple plastic tools available at any autoparts store for a few
dollars. They may come in a set, but make sure you have the 5/16' and 3/8"
sizes. In
this photo you get a good view of the fuel fill hose, the fuel fill vent hose, the front
air vent, and the fuel supply and return lines. The fuel system on the Powerstroke
is a recirculating system, so you have a 3/8" draw hose and a 5/16" return
hose. To remove the two fuel lines you will need fuel/AC quick disconnect
tools. These are simple plastic tools available at any autoparts store for a few
dollars. They may come in a set, but make sure you have the 5/16' and 3/8"
sizes. |
Enlarge Photo
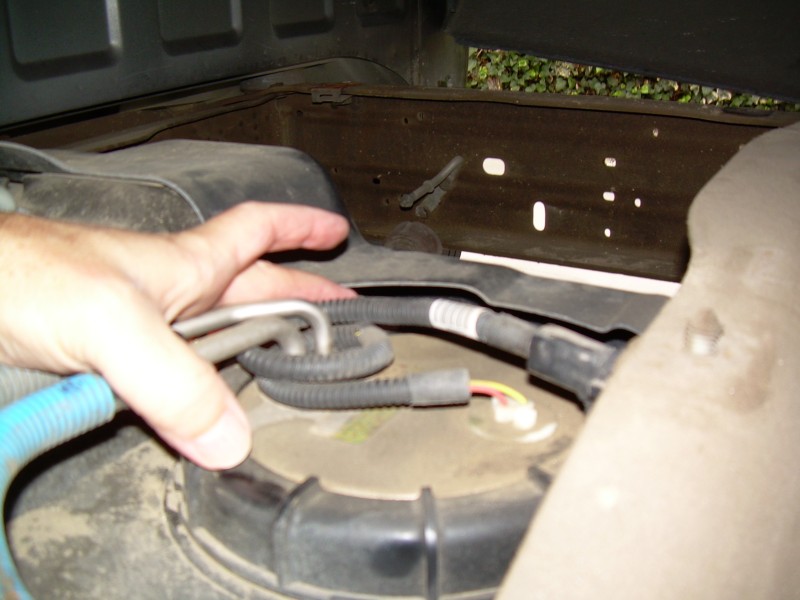
 But
I'm getting ahead of myself a bit. You see all that sand and dirt around the bung
nut? You do not want that to get into your fuel tank. Take a shop vac and
clean as much of that off as you can, and then wipe down the entire area.
Cleanliness will be important. Once you have the area as clean as possible, remove
the fuel lines and disconnect the fuel gauge sensor connector. But
I'm getting ahead of myself a bit. You see all that sand and dirt around the bung
nut? You do not want that to get into your fuel tank. Take a shop vac and
clean as much of that off as you can, and then wipe down the entire area.
Cleanliness will be important. Once you have the area as clean as possible, remove
the fuel lines and disconnect the fuel gauge sensor connector.
Next we have to attack that huge bung nut. Before you turn it, mark the nut and the
tank with a permanent marker so you will know where it should be tightened when put back
together. By permanent marker I mean something that diesel won't disolve.
Don't use a grease pencil, for the obvious reason. Some guys say they used a strap
wrench to turn the nut. But it's a big nut, about 8" diameter and I could not
find a strap wrench that was big enough. Others have said they used a strap wrench,
but increased it's capacity by using an old serpentine belt for the strap. I used a
big screw driver and brass hammer to drive against the lugs of the nut. The nut
seems to be very durable, probably nylon. It will be a tight turn all the way
off. The modified strap wrench seems like a really good idea and I wish I had been
prepared with that information. A strap wrench would be particularly useful when
putting the bung nut back on. You're probably going to need the big screw driver and
hammer regardless just to get the nut broken loose since a strap wrench will have limited
torque. |
Enlarge Photo
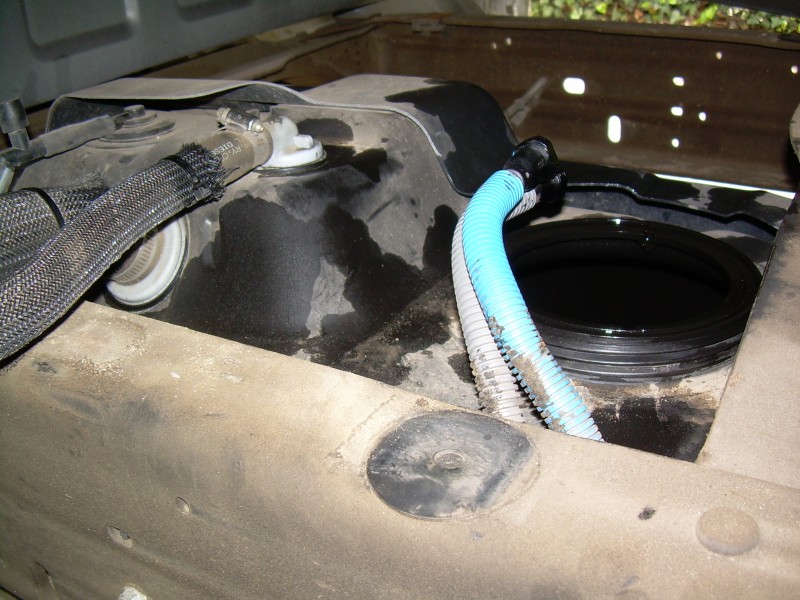
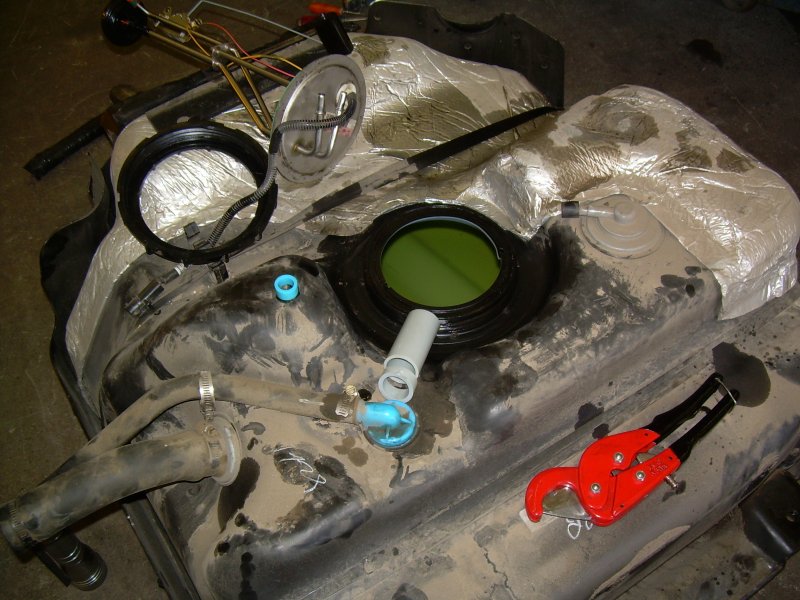
 Here
you can see the bung hole opening after the pickup assembly has been removed. Take a
look down at the next photo to see the part that you will be removing from the tank.
In particular, note the long float arm. That extends toward the rear of the tank and
you will need to manuever it out of the bung opening. Be gentle with it so that you
don't mess up the float calibration. That's another way to ruin your day. Here
you can see the bung hole opening after the pickup assembly has been removed. Take a
look down at the next photo to see the part that you will be removing from the tank.
In particular, note the long float arm. That extends toward the rear of the tank and
you will need to manuever it out of the bung opening. Be gentle with it so that you
don't mess up the float calibration. That's another way to ruin your day.
Remove the bung seal o-ring too. It's a square cross-section o-ring as you can see
in the next photo. Again, clean the opening of any remaining sand or dirt, wipe the
seal clean, and clean the top and bottom of the pickup assembly plate.
Now we are ready to do the actual operation of cutting the fill and vent tubes inside the
tank. If you haven't already, take a look at the link at the top of this page for an
actual inside the tank photo of the plastic tubes we want to cut off. You'll need a
PVC pipe cutter similar to the one shown in the next photo. That tool is available
in the sprinkler section of your local home center. Don't even think of trying to
saw the tubes. You don't want plastic saw dust inside your tank. Just buy or
borrow the tool to do the job right.
As you can see, the tubes you want to cut are actually in the raised section of the tank
end, and are higher than the bung opening. That's right, you have to insert your
entire forearm, with the cutting tool in your hand, into the tank and manage to get the
tool into position on the plastic tubes. The bung opening is around 6"
diameter, so if your name is Billy Biggerarms you might want to ask your young nephew to
come over and help. Or ask your wife, at your own risk of course. I'm a pencil
necked geek, so it was okay. You want to cut them as close to the tank surface as
the tool will allow which is around 1/2". I took a couple of cuts on one of
the tubes as you can see from the remnant pieces in the photo below, and that's no
problem. Once you've made the cuts, fish around the bottom of the tank to retrieve
the cut-off pieces. You are already reeking with diesel fuel, so dipping your hand
into it won't matter now. |
Enlarge Photo
 Okay,
you're done with the modification and all that remains is putting it all back together in
the reverse order. Place the bung o-ring seal in place, and insert the pickup
assembly into the hole. The plate has two alignment tabs, so make sure those align
with the notches in the bung hole. The hardest part of this whole project remains,
and that is getting that danged bung nut back into place and tightened down. Some
guys say that it helps to heat the bung nut before trying to screw it back on. I
managed to avoid that, but keep it in mind. The nut is an interference fit from the
very beginning, so getting it lined up and not cross-threaded is the challenge. What
I did was find the lead-in point of the thread on the tank. Mine was directly toward
the rear, and since these are molded they should all be the same. Then find the
lead-in point of the thread inside the nut. Place the nut on the threads at a point
where these two lead-ins are ready to engage, then push straight down on the nut. It
needs to snap downward a little bit before you start turning it. Hold it down firmly
while you turn just the little bit needed to engage the thread lead-ins. Once you've
got it started it's on it's way. Okay,
you're done with the modification and all that remains is putting it all back together in
the reverse order. Place the bung o-ring seal in place, and insert the pickup
assembly into the hole. The plate has two alignment tabs, so make sure those align
with the notches in the bung hole. The hardest part of this whole project remains,
and that is getting that danged bung nut back into place and tightened down. Some
guys say that it helps to heat the bung nut before trying to screw it back on. I
managed to avoid that, but keep it in mind. The nut is an interference fit from the
very beginning, so getting it lined up and not cross-threaded is the challenge. What
I did was find the lead-in point of the thread on the tank. Mine was directly toward
the rear, and since these are molded they should all be the same. Then find the
lead-in point of the thread inside the nut. Place the nut on the threads at a point
where these two lead-ins are ready to engage, then push straight down on the nut. It
needs to snap downward a little bit before you start turning it. Hold it down firmly
while you turn just the little bit needed to engage the thread lead-ins. Once you've
got it started it's on it's way.
Tighten the nut until the marks you made before removal are aligned, at least. I
won't belabor the point, but I screwed up here and had a leak when I filled my tank with
fuel and had to lift the bed again to further tighten the nut. Yes, this ruined my
whole day. Take my advice and get it tight the first time. That strap wrench
idea might have saved me some extra work.
Reconnect your fuel lines. They will just snap on, no tool required, but make sure
they are clean. Then reconnect the fuel level sensor connector. Lower your bed
using all the same cautions as when you lifted it. Remove your blocks incrementally
as you lower it so that it doesn't get away from you. Once it's lowered into
position on the frame, sight down each side of the bed and cab and shift the bed side to
side to align the panels. Install the bed bolts and tail gate. Install your
filler spout in the side of the bed.
Now you are ready to fill your tank, and give it a good inspection to check for leaks.
Consider taking a 5 gallon fuel can and siphon hose with you to the fuel station,
so that if you have a leak you can immediately lower the fuel level. I wish I had
done that. If all goes well you'll avoid that problem and you will heretofore enjoy
fast easy fillups. |
Enlarge Photo
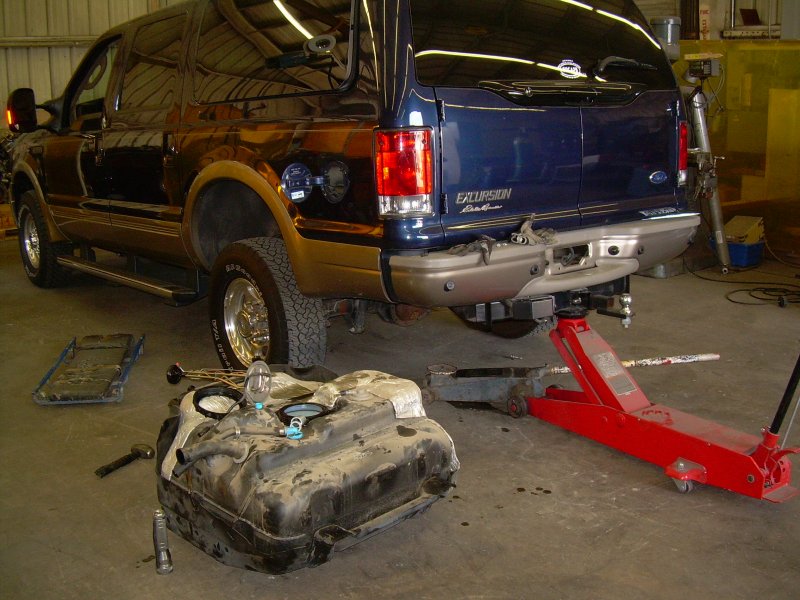
 Some
time after doing my own Harpoon, I helped do the same procedure on a friends
diesel Excursion. The work inside the tank is identical to the above,
but obviously it is necessary to drop the fuel tank instead of raising the
bed. In the photo at left, we used a large floor jack to lift the rear
of the Excursion. The tank is large and there was not enough clearance
between the truck and the floor to slide the tank out, unless we raised the
truck. If you have ramps, try using those instead as it would be
safer. We used a second floor jack to balance and lower the tank.
I would say this should be a 2 man job. One to balance the tank, and
one to handle the jack. I shouldn't have to say it, but you really
want the fuel level to be very low before you do this. It's a 44
gallon tank and even 1/4 tank will be very heavy. Some
time after doing my own Harpoon, I helped do the same procedure on a friends
diesel Excursion. The work inside the tank is identical to the above,
but obviously it is necessary to drop the fuel tank instead of raising the
bed. In the photo at left, we used a large floor jack to lift the rear
of the Excursion. The tank is large and there was not enough clearance
between the truck and the floor to slide the tank out, unless we raised the
truck. If you have ramps, try using those instead as it would be
safer. We used a second floor jack to balance and lower the tank.
I would say this should be a 2 man job. One to balance the tank, and
one to handle the jack. I shouldn't have to say it, but you really
want the fuel level to be very low before you do this. It's a 44
gallon tank and even 1/4 tank will be very heavy.
Because the fill and vent hoses are shorter on an Excursion, we needed to
loosen the hose clamps and remove the hoses from the filler neck. Just
dropping the hoses with neck attached won't work very well. Then there
are 2 bolts in the front and 2 bolts in the rear to drop the tank.
Once the bolts are out, lower the tank very slightly and reach in over the
tank to disconnect the fuel supply and return hoses and the electrical
connector. It is tight in there, but you don't want to stress or kink
the hoses. The skid plate is strapped to the plastic tank, and it all
comes down together, so don't be confused by the strap bands. Once
you've got everything disconnected, lower the tank, slide it off the jack
and out onto the floor to finish the procedure. |
Enlarge Photo
 Once
the tank is out, the components are identical to a pickup truck tank, but
just rearranged a bit. Just reach into the tank and make the same cuts
as was described above for pickups. You can see some of the pieces
sitting on the tank. Once
the tank is out, the components are identical to a pickup truck tank, but
just rearranged a bit. Just reach into the tank and make the same cuts
as was described above for pickups. You can see some of the pieces
sitting on the tank. In this shot you can also see the straps that hold
the tank and skid plate together. Do NOT cut the straps. Then, just
reassemble in the reverse order. |
|
| |
| |
| Email me for comments and suggestions |